
Tutorial kali ini adalah Cara Membuat Cronjob Dengan Google Apps Script. Fungsi dan pengertian Cronjob bisa dilihat di en.wikipedia.org/wiki/Cron.
Free Unlimited CRON scheduled jobs tasks scripts, NO limitations, FULL features, YOUR own free account.
Keuntungan dari Cronjob yang kita akan buat:
sumber
- Setup sederhana dan interface mudah digunakan
- Cron ini memungkinkan pengguna untuk mengeksekusi atau menjalankan perintah/script apapun secara otomatis pada interval waktu yang ditetapkan pengguna
- Bekerja/berfungsi pada semuga jenis server hosting
- Cronjob Replacement, dapat memanggil script pada interval waktu yang ditetapkan sendiri
- 100% aman
- 100% gratis!
- Tidak diperlukan keterampilan dalam pemograman
- Cron tidak dibatasi
- Menyimpan hasil cron ke database
- dll.
Fitur Cronjob yang kita buat:- Tidak perlu aktivasi dan verifikasi
- Tinggal mengcopy paste URL untuk menjalankan Cron
- Waktu dapat dijadwalkan setiap menit, setiap jam, setiap hari, setiap minggu, dll.
- Jadwal cron dapat diatur pada waktu tertentu, contoh: setiap jam 1 pm - 3 pm
- Pemberitahuan jika eksekusi cron berhasil
- Pemberitahuan instant melalui email jika cron gagal
- Script yang dapat di panggil: PHP, Python, Ruby On Rails, JSP, ASP, ASP.NET, PERL, dll.
- dll.
Pertama buka Google Drive [drive.google.com]
Jika Anda belum login, silakan login dulu. Setelah itu, kita buat log cronjob nya dengan cara membuat Spreadsheet.
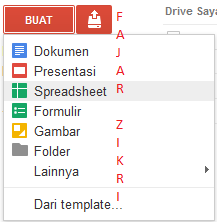
Setelah membuat spreadsheet, edit nama spreadsheet menjadi CronLog.
Copy URL yang ada di address bar spreadsheet, karena kita membutuhkan key nya.
Lihat URL, spreadsheet.
Contoh: https://docs.google.com/spreadsheet/ccc?key=0Atr3j1nvzsd2ZuUJqU1JtbVVlFqdGRXYUxKSMUdLE#gid=0
Berarti Key nya: 0Atr3j1nvzsd2ZuUJqU1JtbVVlFqdGRXYUxKSMUdLE
Kedua, klik Menu Alat lalu pilih Pengelola skrip.
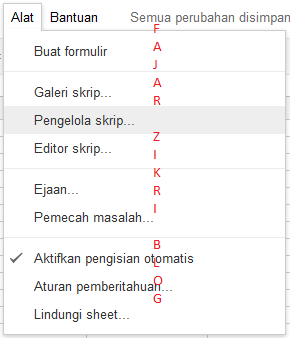
Buat script baru kalau belum ada
. Copy source code berikut dan paste di Kode.gsfunction cronExecute() { var url = "http://www.WEBSITEANDA.com/URL"; var options = { "method" : "get", "headers" : {'User-Agent' : 'Mozilla Firefox 14.0', 'Accept-Charset' : 'ISO-8859-1,utf-8;q=0.7,*;q=0.7' }, "payload" : "", "contentType" : "application/xml; charset=utf-8" }; var request_starttime = new Date(); // fetch the HTTP / HTTPS request and get the response var response = UrlFetchApp.fetch(url,options); var request_endtime = new Date(); // use any spreadsheet, use its key // var ss = SpreadsheetApp.openById("KEY-SHEET"); // use this script's default spreadsheet var ss = SpreadsheetApp.getActiveSpreadsheet(); // get the worksheet var sheet = ss.getSheets()[0]; // inserting values into the sheet sheet.insertRowBefore(1); var colValues = [[ request_starttime, request_endtime, response.getResponseCode(), response.getHeaders().toSource(), url, response.getContentText() ]]; sheet.getRange(1, 1, 1, 6).setValues(colValues); // if something is not working, use the Logger object/function (uncomment it and modify it) // Logger.log(ss.getSpreadsheetTimeZone()); // view the log details from VIEW -> LOGS // You can also RUN the script and view its Execution log // try this VIEW -> EXECUTION TRANSCRIPTS // Make sure you MODIFY and then RUN the script and // verify its working OK by looking at the spreadsheet contents // try this RUN -> CRONEXECUTE // check the spreadsheet contents // After its working OK, you should setup a TRIGGER to execute it as and when you want (frequency) // try this TRIGGERS -> ALL YOUR TRIGGERS }Ganti WEBSITEANDA.COM/URL dengan URL yang ingin di execute Cron.
Ganti KEY-SHEET dengan key spreadsheet Anda.
Sekarang adalah step terakhir dimana kita harus men-setup atau mengkonfigurasi frekuensi pemicu(triggers) untuk kapan dan berapa kali Cron akan dieksekusi.
Lihat gambar di bawah ini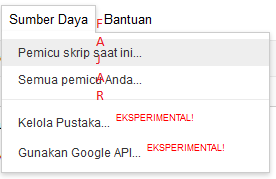
Pilih Pemicu skrip saat ini...
Lalu klik No triggers set up. Click here to add one now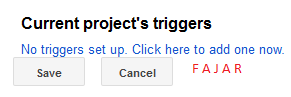
Lalu ganti From Spreadsheet di bagian Events menjadi Time-driven.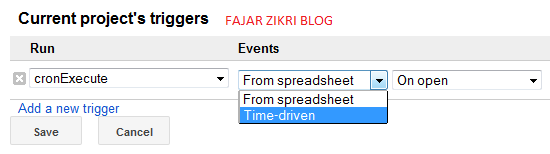
Setelah itu, waktu bisa diatur sesuai dengan yang kita inginkan. Lihat gambar dibawah ini.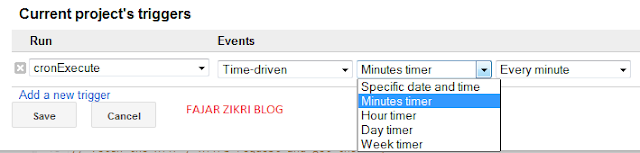
Jika sudah di setting waktunya, tinggal klik Save
Jika Cron nya tidak mau di kasih log, tinggal buka Google Drive, klik Baru, pilih Lainnya, lalu pilih Skripfunction cronExecute() { var url = "http://DOMAINANDA.com/URL"; var options = { "method" : "get", "headers" : {'User-Agent' : 'Mozilla Firefox 14.0', 'Accept-Charset' : 'ISO-8859-1,utf-8;q=0.7,*;q=0.7' }, "payload" : "", "contentType" : "application/xml; charset=utf-8" }; var request_starttime = new Date(); // fetch the HTTP / HTTPS request and get the response var response = UrlFetchApp.fetch(url,options); var request_endtime = new Date(); }Cara setting waktunya sama kaya cara kalau pake Log.
sumber
4 komentar
:hoax
kapan-kapan ajarin dong kk :(
@ginov48 sip contact ane aja di fb :)
blog lu apa gua lupa
Thank gan